
Rabu, 21 Agustus 2013


hampir saja
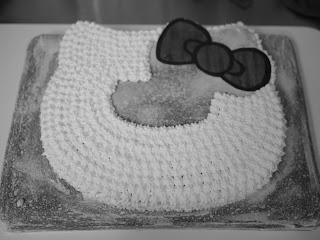
Keep filling in the face as shown. To reserve a spot for the bow, cut it out of your template and place it on the cake as shown.
 Begin piping the pink base as shown. Make the piping stars on your first round bigger than you made on the face to give you a bolder frame (by the "first round" I mean the round pictured above).
tepung

Crumb coat your entire cake with buttercream using a palette knife. A crumb coat is a thin application of icing that seals in the crumbs so they don't come loose when you apply the "top coat". It also helps the top coat to stick. This is also the time to use a little icing to repair any spots where the cake has come apart a bit.

Begin the piping on the bottom-side of the face where the two layers meet. If you haven't done any piping before, try practicing on some baking (parchment) paper until you get the hang of it, or check out any of the helpful tutorials on YouTube on the subject.
imutnya
To cut the shape out of the top layer, place layer on cling film, and then on a cutting board. Blow up your image so that it fits on the cake. I used this image and blew it up by 160%.

Stick your Hello Kitty face to the cereal box and cut around it. You will need to cut off the whiskers that stick out from her face.

Place the template on top of the cake. Using a sharp knife cut around your template slowly with the knife pointed right down perpendicular to the cutting board to ensure straight sides.
Transfer the top layer to the base using the cutting board and slide it off using the clingfilm. This is probably the trickiest part (which may be why I didn't remember to take any photos of it - sorry!).
Slide the cling film out from between the two layers.
kue bro

When your base layer cake is cool, place it on the platter or board you will be serving it on. Put it aside.

what we need?
You will need:
* 2 rectangular white layer cakes measuring about 35 x 26cm and about 4 cm thick. (Click here for the recipe I used, this recipe makes one layer cake. I baked mine in a Teflon roasting dish which also gave me some nice rounded edges.)
* Sharp, non serrated knife
* An image of your character or motif that you can enlarge
* Computer and photocopier (to print and enlarge your image)
* Large cardboard cereal box
* Cake serving board large enough for the finished cake
* 4-5 cups of good buttercream frosting, stiff enough for piping (for the recipe I used click here - it was delicious)
* Piping bag, coupler and star tip (like a Wilton #16)
* Food colouring
* Palette knife (off-set spatula)
* Thinnish liquorice straps
* 6 toothpicks
* Wilton Decorating Gel in black and yellow
kitty

Now the party's all over and the lounge has been de-pinkified, it's time to get on to some of those how-to's I promised.

So here's how I constructed and decorated Miss S's Hello Kitty cake. This idea would work for almost any character or motif. You could replace Hello Kitty with something as simple as a butterfly or heart, or another fictional character that your child loves - the construction and icing techniques will be the same.

Langganan:
Postingan (Atom)
There is a link in this post to the template I used for Hello Kitty's face (by the photos of my template on top of the cake). I just tested the link to make sure that it's still working and it is. Here's the link directly, if it's a bit easier:
https://blogger.googleusercontent.com/img/b/R29vZ2xl/AVvXsEg3WsZRG_wRta5P3kPoFGmF2AHGwf_ATU6WoyTe_htXIlPHjM0t-kFGOXekxMA8DmsNoQxX9XAv8aeRwD8O33Bo5G40_J9XtAl0j1HhXYrW3_TauUVSWqLWE-9NsjvZG6PVoooHW1rNLpjA/s400/hello-kitty-color.gif
Hope that helps.... Any other questions, just let me know.
LM x